My quest for a cheap LCD for Neato XV!
Re: My quest for a cheap LCD for Neato XV!
@Paxman it seems that belidzs did exactly that (used the pin on C6), so it looks like you should be able to do that. If you can get the pinout of the LCD (I couldn't figure out the part number on it and don't want to open my VR100 all over again), you can just check that the trace on C6 goes to a power input for the LCD, which is what I think the problem was originally. I'm not sure about the capacitance on that cap, but if the trace is ripped on one side, you can desolder it and test it. Maybe the datasheet on the LCD says something about a suggested capacitance on that pin? They usually give a recommended value to stabilize input voltage.
Re: My quest for a cheap LCD for Neato XV!
bender,
Thank you for the tip. However, me and the wife decided to buy a new Botvac D6 connected. The reason was that the battery capacity of the D6 enables the bot to finish the whole floor in one charge...and more...and that it can hold two floor plans. This way we can get both the first floor and the basement cleaned...probably on one charge (haven't tested that yet since I need to do some optimisation of the basement first).
So I have quite a few spare parts for the XV-series if anyone is interested...
Re: My quest for a cheap LCD for Neato XV!
Thank you @AlainCAN for your great job !
Re: My quest for a cheap LCD for Neato XV!
You are welcome @ewild !
For information, since this repair on my robot, it still working very well !
For information, since this repair on my robot, it still working very well !
Re: My quest for a cheap LCD for Neato XV!
@AlainCAN do you have the model number of the LCD? I modded my first VR100 and it worked, but while it was at a friend's house, after running for some time the LCD went dim and eventually invisible, so I thought maybe I should adjust the regulator to a higher voltage, but I am concerned what the max voltage the LCD can take.
Also, I have a couple of VR100s that turn on with a blank LCD, but when I turn them off/on again the display works normally (seems like something needs to be warm for them to work). I wonder if it's the same issue?
Also, I have a couple of VR100s that turn on with a blank LCD, but when I turn them off/on again the display works normally (seems like something needs to be warm for them to work). I wonder if it's the same issue?
-
galapogos01
- Posts: 3
- Joined: June 26th, 2020, 11:09 pm
Re: My quest for a cheap LCD for Neato XV!
Hi guys,
FIrst, thanks for a thread dedicated to keeping our old XV's alive!
I have a late-ish XV-21 with a Binky UI board. I bought the OSH Park PCB and the display off BuyDisplay but my efforts have not revived my XV-21
My questions:
1. Reversing the LCD. The backlight came off pretty easy, but is the LCD supposed to have this foil on the back? I am not sure how to remove it so it can be reversed.
2. Is this the right way for the LCD cable to plug in? I have tried both ways, hopefully haven't killed the LCD.
3. Any obvious issues with my soldering? A few of the castellation faces came off so I used some links to ensure connectivity.
Please help as I want to keep it alive!
Jason
FIrst, thanks for a thread dedicated to keeping our old XV's alive!
I have a late-ish XV-21 with a Binky UI board. I bought the OSH Park PCB and the display off BuyDisplay but my efforts have not revived my XV-21
My questions:
1. Reversing the LCD. The backlight came off pretty easy, but is the LCD supposed to have this foil on the back? I am not sure how to remove it so it can be reversed.
Jason
Re: My quest for a cheap LCD for Neato XV!
Hello everyone, sorry for my English I am French.
New to the forum, I have browsed many articles and it is a wealth of information, I want to greet the whole community.
I got a neato XV signature.
I have the screen disease which remains white.
I watched the excellent tutorial from "AlainCAN"
I attach the photos of my welds, I checked them.
on the other hand I liked to know some information please, is it normal that the charger does not deliver 24V ??
I think I did everything like the tutorial so if someone has an idea I'm interested ... thank you very much
-
glnc222
- Robot Master
- Posts: 5490
- Joined: January 23rd, 2012, 8:19 pm
- Location: The Villages, Florida
- Contact:
Re: My quest for a cheap LCD for Neato XV!
I think that is the correct docking plate voltage on the newer chargers, a little lower than the older docks incompatible with newer models; the voltage difference can be one way they detect which version is present. Check specification on the dock label.
Defects in docks show up as failures in charging batteries. A sign of defects is instability in the dock voltage over short periods, oscillations.
For problems with the LCD check the output of the step-down circuit supplying the voltage for the LCD.
I cannot check other features of the mod, never used it. Maybe others can comment.
Re: My quest for a cheap LCD for Neato XV!
ok for the input voltage, for the output voltage we can see on the penultimate photo that it is set as 14v as the tutorial.
a while ago the screen turned on at a time, I was able to adjust the brightness, the time, then 2/3 min later it became white again .. and now it does not turn on all
a while ago the screen turned on at a time, I was able to adjust the brightness, the time, then 2/3 min later it became white again .. and now it does not turn on all
Re: My quest for a cheap LCD for Neato XV!
Hello,
i'm going to do the Alaincan method with my neato. I would like to know if i have to replace the C10 capacitor or not. If i have to, how to do it?
Thanks.
i'm going to do the Alaincan method with my neato. I would like to know if i have to replace the C10 capacitor or not. If i have to, how to do it?
Thanks.
Re: My quest for a cheap LCD for Neato XV!
Did you read his entire post? He said you should do replace it. Use a soldering iron to remove the old one and replace it with a new one of the same capacitance. If that's not clear enough you may want to learn to solder on other boards before attempting this fix.guyom wrote:Hello,
i'm going to do the Alaincan method with my neato. I would like to know if i have to replace the C10 capacitor or not. If i have to, how to do it?
Thanks.
http://www.robotreviews.com/chat/viewto ... 20#p148386
-
ididitmyway.de
- Posts: 1
- Joined: February 13th, 2021, 10:05 am
Re: My quest for a cheap LCD for Neato XV!
2021 and still a new Success on repairing just another Display!
Hey I am new here, and I just register to say!
Thanks a lot!

I note down my version at my website, if some is interested in.
I hope it is allowed to link.
https://ididitmyway.de/VR100.html
Regards Ben
Hey I am new here, and I just register to say!
Thanks a lot!
I note down my version at my website, if some is interested in.
I hope it is allowed to link.
https://ididitmyway.de/VR100.html
Regards Ben
Re: My quest for a cheap LCD for Neato XV!
It's now 2022, and I have gone a little nuts buying old Neato XV-series botvacs. (It all started because they can't climb stairs...) Fact is, I have lots of batteries to fit, which I have gotten very good at reconditionning. 
Two of the Neatos had problems with the LCD, and I was managing without a working display and then I found this thread. Wonderful! But after reading through all the hard work to install a whole new LCD screen, what I found was that adding a cheap voltage regulator was all it took - 10 for $0.78 on eBay.
HOWEVER.. I felt I should add m notes to this discussion. My Neatos have the Binky boards.
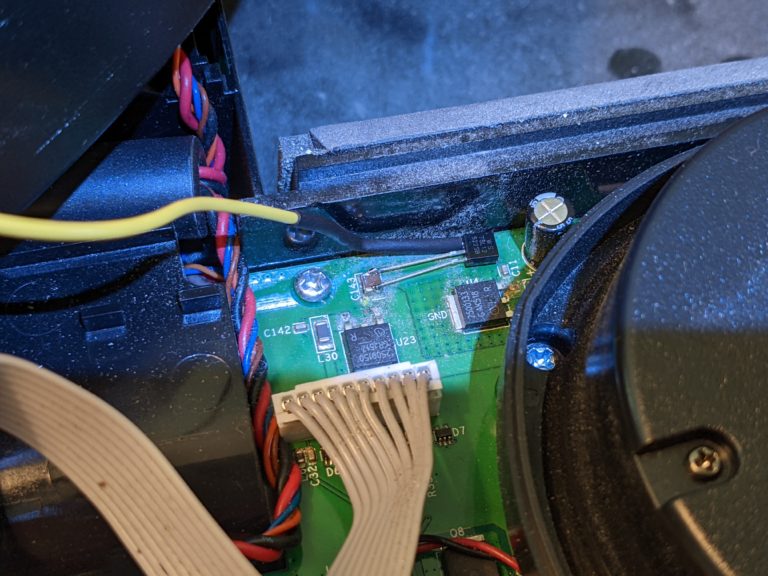
First off, the LM7812 chip is great, but I just bent the leads a bit to "clip" to the sides of capacitor C143 as in this photo from earlier in the thread. That made soldering very easy. Also, I left the heat sink on -there's plenty of room.

I added a connector in the middle of the "green wire" so I could detach the whole top chassis from the bottom. I did NOT remove the boards. That also made it easier with solder the wire to the LCD board. HOWEVER, when I connected the wire to the connector from C5, it did NOT work. Instead, I soldered it to the connector side C6, which is "Vout" and that DID work.
Since I never took the boards off, I did NOT do anything with capacitor C10. At least not yet. One of the two repairs worked great, the other works but the display has very low contrast. I suspect C10 (220mf, 35v) is at fault. I can not adjust the contrast with this fix, which Is probably controlled by the circuits bypassed. (I don't have a schematic so I can't really tell.)
Along the way, in BOTH cases, the LIDAR started failing. I bought a cheap replacement motor ("Neato XV RPS Motor", $7.99) from RobotShop.com. But while I had them open, the LIDAR seemed to be rotating. So, I got out a Q-tip and cleaned the lenses well and everything worked. *IF* I need to open them up again to replace the LIDAR motor, I'll replace the C10 with a 220mf 50v capacitor and see it that solves the dim display issue.
FINAL NOTE: One of these two Neatos I'm working on had a sticker indicating it had been serviced or repaired by "iFixRobot". Most chassis screws were screwed in too tight and had their head mangled. One was actually broken off. Several of them stripped the plastic threads of the chassis. One post was bent over and the screw went beside the post, missing the hole entirely. Suffice to say I am not tempted to send them anything for repair.
Two of the Neatos had problems with the LCD, and I was managing without a working display and then I found this thread. Wonderful! But after reading through all the hard work to install a whole new LCD screen, what I found was that adding a cheap voltage regulator was all it took - 10 for $0.78 on eBay.
HOWEVER.. I felt I should add m notes to this discussion. My Neatos have the Binky boards.
First off, the LM7812 chip is great, but I just bent the leads a bit to "clip" to the sides of capacitor C143 as in this photo from earlier in the thread. That made soldering very easy. Also, I left the heat sink on -there's plenty of room.
I added a connector in the middle of the "green wire" so I could detach the whole top chassis from the bottom. I did NOT remove the boards. That also made it easier with solder the wire to the LCD board. HOWEVER, when I connected the wire to the connector from C5, it did NOT work. Instead, I soldered it to the connector side C6, which is "Vout" and that DID work.
Since I never took the boards off, I did NOT do anything with capacitor C10. At least not yet. One of the two repairs worked great, the other works but the display has very low contrast. I suspect C10 (220mf, 35v) is at fault. I can not adjust the contrast with this fix, which Is probably controlled by the circuits bypassed. (I don't have a schematic so I can't really tell.)
Along the way, in BOTH cases, the LIDAR started failing. I bought a cheap replacement motor ("Neato XV RPS Motor", $7.99) from RobotShop.com. But while I had them open, the LIDAR seemed to be rotating. So, I got out a Q-tip and cleaned the lenses well and everything worked. *IF* I need to open them up again to replace the LIDAR motor, I'll replace the C10 with a 220mf 50v capacitor and see it that solves the dim display issue.
FINAL NOTE: One of these two Neatos I'm working on had a sticker indicating it had been serviced or repaired by "iFixRobot". Most chassis screws were screwed in too tight and had their head mangled. One was actually broken off. Several of them stripped the plastic threads of the chassis. One post was bent over and the screw went beside the post, missing the hole entirely. Suffice to say I am not tempted to send them anything for repair.
Re: My quest for a cheap LCD for Neato XV!
The Blinky board needs the connection to C5, I suspect you have the Cruz board, which needs the voltage on C6.HOWEVER, when I connected the wire to the connector from C5, it did NOT work. Instead, I soldered it to the connector side C6, which is "Vout" and that DID work.
Re: My quest for a cheap LCD for Neato XV!
I've lived with a blank screen for a few years, but recently the robot started to beep error messages and refused to start up correctly, and I couldn't figure out what the problem was without the screen.
So I found this thread and decided that injecting 12 volts to the c5 line would be worth trying (I'm NOT going to go to the effort of replacing the entire LCD, especially if I have to remove polarized sheets and reverse it ;> )
I used a 78L12 12v 100ma linear regulator (TO-92 package) because it was inexpensive and small.
Thanks to AlainCAN, this fixed my LCD and I can now read the error message (fan was stuck, I found/removed a rice grain and that fixed things right up!).
Unfortunately, I somehow appear to have broken the LED's (backlight for LCD as well as the button LEDs). I'm not sure if this is related to this throwaway line in Alain's post:
Or perhaps I just forgot to plug something in..... but I can read the screen, which is better than having LED's without being able to read the screen, so I'm going to count it as an overall success.By the way, don't forget to replace the C10 capacitor as it can cause trubbles later (dimmed light green led).
Re: My quest for a cheap LCD for Neato XV!
Just acquired an old XV-11. Works great!
But now, I can't get any action out of the softkey Menu.
The display works fine and shows the current status during operation. But I can't navigate the menu because the softkey switch is not functioning.
I wonder if it could be as simple as a dirt issue, poor contact?
I haven't taken it apart yet.
So, not being electrically minded I'm wondering how I might go about diagnosing and resolving this issue without replacing the entire LCD board (Binky UI 290-0026)
Re: My quest for a cheap LCD for Neato XV!
So, I've pulled this apart to inspect it, and it looks pretty clean!
Now I'm wondering if there is a way I can check it with my multimeter? The red circled area is the nonresponsive switch.
Or run power to it disassembled to see what it does?
Now I'm wondering if there is a way I can check it with my multimeter? The red circled area is the nonresponsive switch.
Or run power to it disassembled to see what it does?
Re: My quest for a cheap LCD for Neato XV!
Checking in to report another success story reviving an aging XV15 suffering from a blank LCD.AlainCAN wrote:Ok, Good news, it didn't take fire in my house and let's say that in fact, you will need more than one wire, there is no 12V regulator on board, so you have to add one (you can find some very cheap on eaby, at ~3 euros.).
After installing new batteries a year ago, my xv15 was immediately stuck in an unknown start-up sequence. I was unable to get it back to life due to the blank screen of the LCD http://www.robotreviews.com/chat/viewto ... 20&t=23134 because I had no idea what buttons to press to initialize it to its normal operational state.
It has been sitting in storage ever since, until I discovered this thread a week ago. Long story short, I ordered an L7812 and hooked it up to the main power leads and connected the 12V out to the vacant C6 solder pad on the CRUZ UI BOARD (I have a cruz 113 neato).
Going through the setup sequence (initial screen showed chinese symbols
Thank you
Re: My quest for a cheap LCD for Neato XV!
Hello all,
first of all big thanks to AlainCAN for his solution to get the display of the Neato XV back to life. I have a Vorwerk VR100 and it is quite similar to the XV, but unfortunately only "quite similar". The disaplay board is a "CRUZ" and so it is the C6 solder point here. For the motherboard, I used the location shown below. For the voltage regulator I also used the "LM2596S DC-DC Step down" and set it to about 12.5V.
Here the connection at the display board (I took here the picture of "slybas" (thx) (is identical to the VR100).
http://www.robotreviews.com/chat/downlo ... w&id=10694
http://www.robotreviews.com/chat/downlo ... w&id=10695
For the power supply I used the following points on the motherboard (here during charging the voltage is about 23V and without charging station 14.8V (Li Ion) ).
http://www.robotreviews.com/chat/downlo ... w&id=10696
Many thanks to the community here. My VR100 is back.
(This article was machine translated from German with the help of DeepL)
- Attachments
-
- vorwerk_vr100_cruz_Motherboard
-
- CRUZ-Display-Board-C6-Connection
-
- CRUZ-Display-Board-Original
Re: My quest for a cheap LCD for Neato XV!
Huge necro-bump here, but I'm having a hard time finding solid information anywhere else. Unfortunately a lot of links are dead now.
I pulled my old XV-11 out of the basement deciding to fix it, and found that it uses the Cruz board. The thread has been a little hard to follow as the discussion jumps between the Binky and Cruz boards, not necessarily saying which in each post.
Just had a few questions.
Is the display module actually the same between the Binky and Cruz boards? Can the display be transplanted from one to the other? There were a couple Binky boards on eBay recently (but now they're gone).
Is there a serial number range that indicates which revision a specific unit might be (in order to find relevant for-parts donors)?
Is there a list of component values somewhere for the Cruz board?
I've seen mention of replacing certain capacitors (like C10) and some in other threads, but not necessarily which revision board those refdes and values correspond to (or if it's actually the display board or motherboard). I don't know where this information originally came from in the first place.