Surveyor SRV-1 Blackfin Robot Review
The Surveyor SRV-1 Blackfin Robot is an Open Source Wireless Mobile Robot with Video camera. The SRV-1 is designed for research, education, and exploration.
Surveyor's SRV-1 internet-controlled robot employs the SRV-1 Blackfin Camera Board with 1000MIPS 500MHz Analog Devices Blackfin BF537 processor, a digital video camera with resolution from 160x128 to 1280x1024 pixels, laser pointer or optional ultrasonic ranging, and WLAN 802.11b/g networking on a quad-motor tracked mobile robotic base.
.preview.JPG)
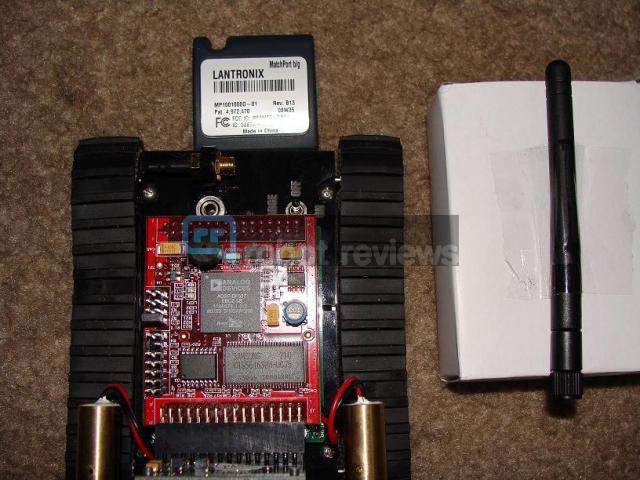
I received the SRV-1 Blackfin robot which consists of the Blackfin camera, Wi-Fi with Expansion Module (2 PCB’s), robot base, charger and battery. There are other items one can purchase to either add/modify. You should possess knowledge in wireless networks, Java, program in C, terminal program, as well as XMODEM (for firmware update) to name a few.
OPENING UP THE BOX:
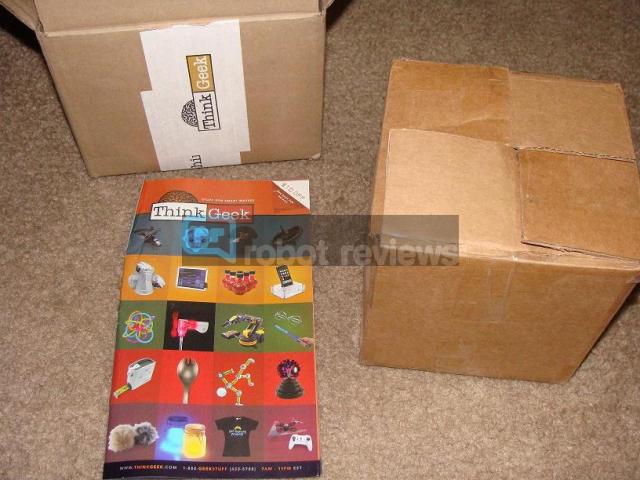
ThinkGeek is one of the few retailers that carry the SRV-1. I received the SRV-1 packaged well. When you open up the package, you are greeted with the SRV-1 wrapped in bubble wrap, and a box with the antenna taped to the box. The box contains the charger brick. ThinkGeek included a catalog and the invoice. There is nothing else. One might be wondering if they forgot the Instruction Manual, Quick Start guide, something. Not in this case. ThinkGeek does include a link back to Surveyor’s website which walks you through setting up your SRV-1.


·
SRV-1 Blackfin Camera
o 500MHz Analog Devices Blackfin BF537 Processor (1000 integer MIPS)
o 32MB SDRAM, 4MB SPI Flash
o JTAG (tested with section5 ICEbear USB-JTAG)
o SPI Flash and UART boot mode select
o External I/O Header (32-pin - 16 x 2 x 0.1")
o 3.3V Input - 145mA total draw at 500MHz, including camera
§ Board dimensions - 50 mm x 60 mm (2.0" x 2.6"), 36g (1.25 oz) including camera module
§ UARTS - tested at up to 2.5Mbps with CTS/RTS flow control
§ 4 Timers (2 share pins with UART1)
§ SPI - 2 slave select, 1 master select
§ I2C
§ 16 GPIO
§ "S-32 expansion bus" header will support stacking of expansion boards
§ RoHS compliant
· Stereo Vision System
o Two SRV-1 Blackfin Cameras with 90-deg FOV lenses (3.6mm F2.0) separated by 10.75 cm (4.25")
o Interprocessor communications via SPI bus (64MHz)
o Wi-Fi communication via Lantronix Matchport WLAN 802.11g radio w/onboard 3dB dipole antenna
o On-board 3.3V high efficiency switching regulator (Recom R-783.3-1.0) for battery input (4.75 - 18.0 VDC)
o Headers for 8 servos (5V supply provided)
o Dual H-bridge motor driver (Fairchild FAN8200) with 1000mA capacity per motor
o Two switching transistor drivers with 100mA capacity for lights and laser pointers
o Low battery detect circuit
o Headers for 8 servos (5V regulator provided)
o Extended pin headers for full access to S-32 expansion bus of both processors
o Board dimensions - 60 mm x 150 mm (2.5" x 6.0"), 140g (5 oz)
o 1" x 2" mounting hole pattern for compatibility with SRV-1 robot base (dual and quad motor versions)
o RoHS compliant
· SRV-1 Wi-Fi with Expansion Module
o This is a bundle of the SRV-1 Blackfin Camera with the combo radio/motor that controls the SRV-1 robot and the Matchport Wi-Fi 802.11b/g radio module. Two-board set includes Blackfin Camera with 500MHz Analog Devices Blackfin BF537 processor, 32MB SDRAM, 4MB Flash, and Omnivision OV9655 1.3 megapixel camera, along with combo radio/motor board, Lantronix Matchport b/g radio module and antenna. It is essentially all of the electronics of the SRV-1 robot except for the battery, motorized base and laser pointers.
There are other parts available on the website.
SUPPORT:
There is plenty of support via the SRV-1 forum, website, and email. One of the main contributors in the forum is very knowledgeable. As like any forum, it draws people who are having issues with their robot, as well as wanting information in hooking up a sensor, or asking about code. Turnaround for an answer is very quick. I have asked quite a few questions, and member Admin has answered them all quickly and professionally. If you run into any issues, member Admin will take care of you.
CONNECTING VIA AD-HOC:
The instructions say that the SRV-1 will act as a DHCP server, and to have your computer obtain IP address automatically. The first time it didn’t issue my laptop an IP address. Once I configured it statically within the same subnet I was able to connect once. I didn’t change anything, I was just browsing. The second time I tried to connect, I couldn’t communicate to SRV-1. The only way to change the settings is to get a serial connector. This issue is literally littered throughout the forum, and has its own Sticky. The creators of the SRV-1 are kindly sending me out a serial connector which I can use to program the Lantronix (Wi-Fi) via serial. Until then, my SRV-1 is a very expensive paper weight. Wish it wasn’t during the very long weekend (Murphy’s Law).
CONNECTING VIA AD-HOC (Take Two):
I received the serial connection in the mail today (3 days later). It came un-soldered, which thankfully this is easy on people who don’t solder well (Like me). After I soldered the 3 wires on, I connected it to my laptop. First, you will want to download and install the drivers for the CP2102 (Serial/USB connector drivers). After that, use a terminal program of your choice (Some are better than others). I used Terminal by Br@y++. Very easy to configure and use. Once I configured some of the settings, I was able to connect to the SRV-1 Java Console.
The SRV-1 handles well with a 320x256 resolution. If you raise it to 640x512, the camera gets a little bit pixilated, and it’s not as fluid like in the video as well as the motor controls. The different resolutions are as follow:
- 160x126
- 320x256
- 640x512
- 1280x1024
The range while running in Ad-Hoc is very good. I test drove it at my work, which I was able to drive it to the break room, which is about 450 feet away. During the drive with the resolution set to 320x256, the SRV-1 was very responsive with the controls and the video was very fluid. But, this is Ad-Hoc with no encryption to slow it down. I will have to see how well it handles in Infrastructure mode.
CONNECTING VIA INFRASTRUCTURE:
Configuring the SRV-1 to my infrastructure was very easy. It gladly accepted my WPA2 passphrase. Running the SRV-1 within my network was very smooth, just like running via ad-hoc despite all of the encryption going on. I have been using 320x256 with quality set to 2. I find running a higher resolution is a bit laggy. The reception is great. The SRV can roam all through my home without loss of connectivity. The SRV doesn’t lose connection to my firewall. The Matchport is very stable.
CONNECTING/CONFIGURING VIA SERIAL:
Connecting via serial is easy, once you have the board mentioned above. You just need to have the terminal program configured on the correct COM port, data bits, parity stop bits and handshaking. From there you can configure all of the settings of the Matchport. It is well documented as to what all needs to be changed. This is your “Last Resort” to communicate to the Matchport.
.jpg)
.jpg)
CONNECTING VIA EXTERNAL CONNECTION:
Connecting via external connection is pretty straightforward (Depending on your knowledge of firewall rules, port forwarding, etc). You will want to forward port 10001 to the IP address of the SRV-1 Blackfin. The DelphiSRV program is very “bloated” and doesn’t perform well externally, and is a little slow internally but you have a lot of options available.
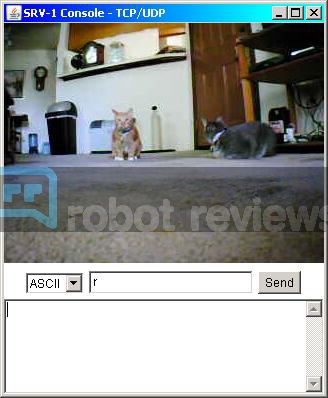
The SRV1Console from Surveyor works very well. It runs the same speed internally as externally. The motor functions respond well with the video feed.
OPERATING THE ROBOT WITH DIFFERENT JAVA CONSOLES:
There are different programs you can use to operate the SRV-1. The main program is the SRV1Console which you can move the robot around, change the resolution, and turn on the lasers which is available from the Surveyor website. With the SRV1Test console, you can issue commands which can control the robot (No buttons). There is a command list one can view/download with the various commands the SRV-1 accepts.
I have used SRV1Console, SRV-1 Test, and DelphiSRV. All 3 programs work well communicating to the robot internally. Like I have stated before, you will want some knowledge of java since there is some compiling that needs to be done with the SRV-1 test console at first. If you don’t have Java SDK installed, Surveyor does have the precompiled class files. You will want to change some of the settings to correspond to the SRV in your network (IP address, TCP/UDP, remote port). I explain each console in detail a little later on.
WebCamSAT:
WebCamSAT is a web server module that is on-board the SRV-1 Blackfin. You can set a schedule when the video feed will be recorded and played back whenever. The SRV-1 has only 1 camera account enabled with the software. One can purchase a license to add more cameras/users if you want to stream multiple videos online.

VIDEO FEED:
Resolutions above 320x256 get choppy and slow down due to the information being sent. One can purchase an updated camera which works better in lower levels of light, as well as a couple of different lenses. You can also select the quality of the camera, which q1 is the highest, and q8 is the lowest setting. I personally have been running mine on q2.
TAKING PICTURES:
There isn’t a dedicated button in SRV1Console program one can press to take a picture quickly. You can use the Alt-Print Screen button on your keyboard to get a snapshot of the window (Then crop out the picture later on). You can easily get a picture in DelphiSRV.
COMMAND LIST:
There is a lengthy command list one can execute via a terminal program with TCP / telnet capability (Or with a compatible console). These commands range between motor controls, setting resolution, turning lasers on/off, and vision commands to name a few.
DIFFERENT PROGRAMS:
· Microsoft Robotics Developer Studio 2008
o I haven’t been able to access the SRV-1 from within this program. I have set this program aside for now, thus not getting it to work yet. This program would be a great tool to use.
· Surveyor SRV1 Console
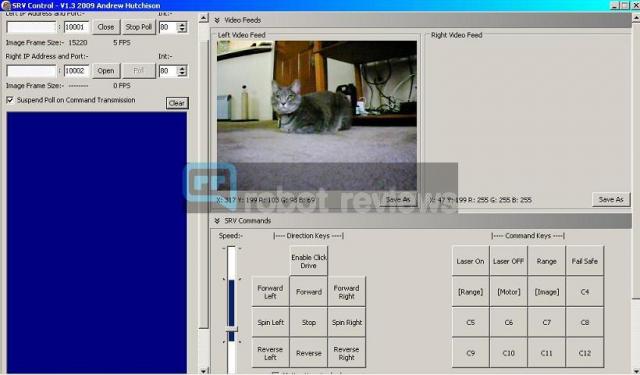
o This console comes from Surveyor. You have to edit the srv.config file with the changed IP address (IF you have changed the default IP address). Other than that, it is pretty simple. You can control the drive motors, turn on/off the lasers, and change the resolution. The Fast/Slow and failsafe buttons don’t work with the current firmware.
_0.preview.JPG)
· Surveyor SRV1 Test Console
o This test console is much smaller and runs quicker due to the less overhead (Less buttons). You will either have to compile the source code, or Surveyor has it precompiled it for you. You have to change a few settings in the first few lines of the source code. All you can do is view the camera and issue it either ASCII or Hex commands.
·
DelphiSRV
o This is the “crème-de-la-crème” of consoles (I have found so far). You only have to configure the IP address of the SRV-1 and remote port. With this program, you can drive your SRV around with buttons, or point and click on the image. You can view what the commands are being issued to the SRV. It works great with SVS with 2 cameras, and produces an anaglyph picture. You can issue ASCII commands. You can configure buttons for certain commands you want easy access to. It even comes with a C Program editor which you can load/save to/from flash. It is a very intuitive program. One gripe is that you can’t resize the program. With my netbook, the max resolution is 1024x600. I have to scroll to get to all of the controls. It is also very slow running the SRV-1 externally with this program.
EXPANDING:
One can easily add the expansion board which makes it easier to hook up sensors, servos, etc to the blackfin. You can also move the blackfin setup to a larger base to have more room for sensors and batteries. The Blackfin is very portable and easy to move from one setup to another easily. The only drawback I have is that when you purchase the whole robot like I did, is that the power supply is soldered to the board. If you purchase the items separately, you hook up the power via a connector.
UPDATING FIRMWARE:
Updating the firmware on the blackfin takes a few steps, and one might not accomplish it on the first few tries. In fact, a member of the forum said it took them over 50 times to finally flash the firmware!! Thankfully I am running the latest firmware on the Blackfin.
Updating the firmware on the Matchport is a bit easier, thankfully to the DeviceInstaller program that can be downloaded from the Lantronix website. The program can search for Lantronix devices on your network. Once it finds the Matchport, it displays all configuration settings, and can easily update the firmware. I found an update to the Lantronix, and decided “Why Not”. The firmware update went very smooth. It rebooted and I was talking to the Matchport in no time. I just couldn’t receive any video from the blackfin. It’s off to the forums again to ask what needs to be done. Member Admin replied very quick and responded that the updated firmware isn’t compatible due to it not being able to run at 2500kbps UART. The matchport is configured with a custom version which handles the custom rate.
You have the option of running the new firmware on the Matchport, but you have to create a 921kbps version of the srv1.ldr, upload it to the blackfin, and then reinstall the updated firmware to the Lantronix. Admin said that there isn’t an advantage with the new firmware. So, I downgraded the Matchport firmware easily and I’m back up and running again.
PRO’S:
- The components have the “feel” of quality craftsmanship.
- Excellent support via forum, website and email.
- The video response is very good.
- The drive controls respond well.
- The battery lasts a good while (~3-4 hours).
- There are plenty of programs that can control/access the SRV-1
-
CON’S:
- Robot is designed for moderate to advanced users. A beginner can purchase it, but the learning curve in certain areas can be steep.
- No written instructions or Quick Start guide.
- You have to have a good light source to produce good video. The camera doesn’t perform well in low-light levels.
- The SRV can’t drive on the charger like the Rovio to charge the batteries automatically.
- You can keep the SRV on to access via externally but you only have ~3-4 hours of run time before the battery will die.
- If you want to access the SRV-1 externally, you have to use an external program to access it. You just can’t use your browser only to access the SRV-1.
- Accessing the SRV-1 externally is very slow (Via DelphiSRV). If you set the resolution to the lowest setting and the quality all the way down, it is still choppy and the motion is very choppy.
OVERALL:
The SRV-1 Blackfin is a moderate to advanced level webcam. Everything that has to do with the SRV-1 blackfin runs on Open Source, which means you have access to the firmware and can make changes as you wish. A beginner ‘can’ work with this webcam, but might struggle within a few areas, which they can get answers easily by posting in the forum. The SRV-1 is a small unit to showcase what one can do on a smaller scale. All one needs to possess is some knowledge to move the blackfin modules onto another platform, add sensors, and program the Java client to access the sensors.
If you are thinking on getting into robotics, there is better entry-level robotics for one to start into (Plus costing cheaper). But, if you don’t want to waste your money on a less-advanced robot, then I would get an SRV-1 Blackfin.
Think about whether you either want to get the stereo vision system or what “Package” you want from Surveyor. If you shell out the ~$475.00 for the whole robot, and want to upgrade to the SVS, you will be paying more since the SVS already comes with 2 blakfin controllers, 2 cameras, plus the matchport. From the looks of it, I don’t think the SVS can be hooked up to the stock robot (Not enough clearance of the tracks). One would want to get the pan/tilt head to hook up to the SVS. Do some research as to what you are wanting, and it might be more advantageous to piece things out (ie if you want to get a beefier base).
I give the SRV-1 Blackfin 4 out of 5 stars.
- Printer-friendly version
- Login to post comments
Online forum users
Registered users: Bing [Bot], Google [Bot], Google Feedfetcher
Latest News
Latest Reviews
Latest Blogs
- Navibot SR 8855 wrongly reports battery is already charged so it won't charge at all
- Roomba 531 quite sick
- Neato D7 scratched new hw floors
- Botvac 65 software question
- The Most Promising Companies in Robotics
- error on wi fi indicator
- Caveat Emptor - Neato Connect
- Say no to dust, sweeping robots care for your family
- How to replace the battery in the iRobot Roomba
- To Anyone Else Having "Erratic Behavior" with a Neato
Today's Hottest Deals
-
 $399.99$299.99
 -
 $699.99$599.95
Poll
User login
Subscribe to RSS Feed
Show your support

Comments
Pricey
Submitted by Tearstone on Thu, 05/14/2009 - 3:16pm.I believe all of the PCB's
Submitted by fraggboy on Thu, 05/14/2009 - 5:32pm.Regards, Chris
Questions? Check out the READ FIRST section. Your question might have been answered already. It opens up in a new window.
This is from Surveyor: "All
Submitted by fraggboy on Thu, 05/14/2009 - 7:22pm.Regards, Chris
Questions? Check out the READ FIRST section. Your question might have been answered already. It opens up in a new window.